Air Fryer Accessories That Actually Fit: A Basket-Size Buying Guide
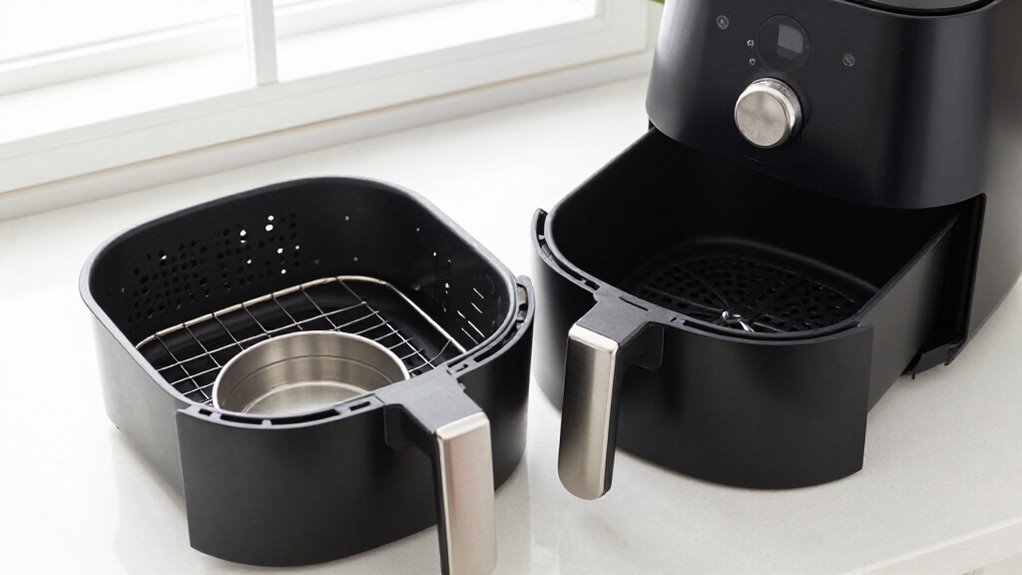
To find air fryer accessories that fit, measure your basket’s usable interior at the floor, including narrow points, rims, and sloped walls. Check its shape and exact model; quart ratings and “universal” labels don’t guarantee compatibility.
Compare accessory dimensions and height with available space, leaving room for airflow, heating-element clearance, and safe removal.
Match materials and shape to your cooking tasks, and verify care instructions. Continue for practical fit checks and accessory choices for your basket.
Measure Your Basket First
Before buying an accessory, measure your basket’s usable interior width and length—not the air fryer’s exterior—and check its depth and shape.
Measure from the basket’s inside edges, including any area a crisper plate or raised rim makes unusable. Record the depth too; a low accessory may fit across the base yet leave room or prevent the drawer from closing. Compare these figures with the product’s listed dimensions, and leave clearance around the accessory so hot air can circulate.
For liners and ramekins, match the stated size to your basket; paper liners come in eight sizes and shapes. Check your air fryer’s model and the manufacturer’s guidance before buying, especially when a kit claims compatibility with a capacity such as five-quart models.
Check Basket Shape and Taper
Check whether your basket is round or square, then measure its usable width and length at the bottom, where the accessory will rest. Don’t rely on advertised capacity or the basket’s opening dimensions; neither tells you how much space a liner or pan has at its base.
Next, account for tapered sides. A round basket may narrow toward the bottom, just as a square one may have sloped walls. An accessory sized to match the top can be too wide to sit flat below. Compare its listed dimensions with the basket at the height where it’ll rest, and leave enough room to lift it out without forcing it.
For liners and baking dishes, check the dimensions and shape specified for your air fryer model. A close match uses space better than a mismatched shape or oversized accessory.
Confirm Accessory Clearance
Will it fit once the basket’s in place? Measure usable height from basket floor to heating element, not just overall depth; tapered walls can steal room. Compare accessory width and height with those interior measurements, leaving side gaps for airflow and at least 1–2 cm above it where required.
| Check | Small basket | Larger oven |
|---|---|---|
| Side gap | 3–5 mm | 5–10 mm |
| Top gap | 1–2 cm | 2–4 cm |
| Tall rack | Add tiers | Recheck fan |
These are starting points; follow your manual’s limits. For stacked inserts, add each tier’s thickness and gaps, then check the top rack against the fan.
A too-tight fit can choke circulation, brown food unevenly, scorch parts, or strain the drawer. Leave enough room to slide the accessory out without forcing it.
Accessory Material and Shape
Choose heat-safe silicone or durable metal, and check the temperature rating before you buy. Flexible silicone cups and perforated paper liners preserve airflow better than solid liners. Match each liner, pan, or rack to your basket’s shape so it fits comfortably without blocking circulation.
Heat-Safe Materials
Because air-fryer accessories sit close to the heating element, check their temperature ratings before use: silicone liners may be rated to 430°F, while GOAUS paper liners are rated to 428°F. Choose food-grade, BPA-free silicone, stainless steel, or oven-safe glass for bakeware and tools, and confirm each item’s stated limit matches your recipes. Don’t assume a material is safe at every air-fryer setting; follow the product label and appliance guidance.
For baskets and racks, stainless steel offers an alternative, while coated metal needs careful handling to preserve its finish. Use silicone-tipped tongs and soft-bristled brushes so you’re less likely to scratch a nonstick basket. Check shape as well as material: a liner should sit comfortably inside the basket, with room for air to circulate. Perforated or ridged liners leave channels around food; a solid liner can restrict airflow and reduce crisping. Never force an accessory that blocks vents or prevents the drawer from closing.
Flexible Silicone Shapes
Flexible silicone liners give you a reusable, nonstick alternative to paper, and their soft sides make them easy to remove and clean. Before buying, measure your basket’s interior width or diameter and depth, then compare those figures with the liner’s dimensions. A fit keeps the liner stable without covering vents or restricting airflow; don’t force an oversized shape into a square or round basket.
Ridged bottoms lift food above the base, letting hot air move underneath; smooth-bottom liners won’t provide that elevation. For muffins or small bakes, silicone cups and dishes offer another option, but check each item’s footprint and height against basket clearance. Some liners are dishwasher-safe and withstand temperatures up to 430°F; check the product’s rating and care instructions.
Perforated Paper Liners
Perforated paper liners simplify cleanup while allowing more airflow than solid liners. Choose a pre-cut liner whose listed dimensions suit your basket; options include 7.9-inch rounds and other sizes. Perforations let hot air pass through the paper, supporting more even cooking than an unperforated liner, which can restrict circulation.
The trade-off is straightforward: more airflow helps browning, while paper still separates food from the basket surface. It can reduce sticking and catch residue, so you’ll spend less time cleaning.
Check the product’s heat rating; for example, GOAUS liners are rated to 428°F. Follow your fryer’s manufacturer’s guidance.
Don’t preheat with only a liner inside. Add food first to weigh it down and prevent it from lifting toward the heating element. Confirm dimensions before buying.
Match Shape to Basket
Match an accessory’s shape to your basket’s usable interior, round, square, or rectangular, to prevent crowding and preserve airflow. Measure the interior before buying; a dish or ramekin should sit comfortably without pressing against the sides. Round baskets suit round liners and pans; square or rectangular baskets use matching shapes to preserve more usable surface. A mismatched accessory can crowd food or obstruct circulation.
For liners, choose perforated paper or ridged silicone with air channels beneath food. Paper options come in several shapes and sizes, including 7.9-inch rounds; match the diameter to your basket. Check temperature ratings: GOAUS paper handles up to 428°F, while Siudangka silicone is rated to 430°F. Oven-safe metal, silicone, or glass can work for baking dishes, but verify dimensions and your fryer manufacturer’s guidance. Avoid accessories that scratch the nonstick coating, cover vents, or restrict airflow; don’t force a tight fit.
Choose Accessories by Cooking Task
Match perforated parchment or reusable silicone liners to your basket’s shape and size, and leave vents clear. Choose silicone-tipped tongs for handling food, then use muffin cups for egg bites or a small pan for cakes and casseroles. For larger batches, compare rack and skewer dimensions with the basket and preserve room for airflow.
Match Liners to Baskets
Before buying a liner, measure your basket and check whether it’s round or square; pre-cut options include 7.9-inch rounds, but the right size should sit flat without blocking airflow. Choose a liner that leaves vents open; an oversized sheet can restrict circulation, while a small one won’t catch residue. Perforated paper keeps air moving around food, making it a disposable choice when crisping matters. Use it for quick cleanup, but add food before heating: an empty liner can lift or scorch.
Ridged silicone is reusable and raises food above the surface, creating channels for hot air. It suits repeated baking or roasting and is dishwasher-safe; check its 430°F limit against your recipe. GOAUS paper tolerates 428°F. Pick by task; confirm the liner sits flat.
Pick Tools for Handling
Choose handling tools by the job: 13-inch silicone-tipped tongs flip wings and lift vegetables while protecting nonstick baskets, while shorter 9.5-inch tongs may suit small baskets but can scratch if their tips are bare metal. For temperature checks, use a quick-read meat thermometer to test chicken, beef, or fish for safe doneness without overcooking. A silicone basting brush spreads oil, glaze, or marinade evenly, useful for BBQ chicken or teriyaki salmon.
When you’re lifting a hot basket, grate, or pan, choose a plate gripper with a secure rubber clamp; it offers control without grabbing edges with a towel. For fries or vegetable chips, a mandoline makes uniform slices for even cooking. Check its footprint and setup for your workspace.
Choose Bakeware by Dish
What you’re cooking determines which bakeware works best: use a small oven-safe dish or ramekin for lava cakes, baked oats, apple crisp, or a single-serve casserole, and check that it fits comfortably inside the basket.
For muffins or egg bites, choose reusable silicone cups; sturdy cups can stand alone without a metal pan, though OXO’s are smaller than standard paper liners.
A round pan suits cakes, while a small loaf pan works for meatloaf. Check whether metal, silicone, or oven-safe glass is rated for air-fryer use.
For pizza, egg muffins, or kebabs, an accessory kit may bundle a pizza pan, muffin tin, cake pan, racks, and skewers. Compare its contents with your recipes, and verify appliance compatibility; kits for most 5-quart models might not suit another basket size. Leave room around bakeware for air to circulate; don’t force it in or block vents.
Measure Racks and Skewers
For extra cooking space, measure your basket’s usable width, depth, and height, then compare those dimensions with the rack or skewer listing and your air fryer’s model compatibility.
Choose stackable racks when you want to cook meat and vegetables at once; check added height for airflow and drawer closure. Racks can hold light pita or tortilla chips in place so they don’t scatter. Choose skewers for meat, vegetables, or fruit kabobs, especially appetizers. Compare footprint with basket shape and leave clearance for loading and airflow.
Match accessory to task: racks expand capacity; skewers organize ingredients. Stackable designs suit multiple batches, but uneven levels may need rotating during cooking. Check model compatibility, not just advertised size, before ordering. Avoid overcrowding, which can limit crisping inside.
Check Handle Clearance
Even when a dish fits the cooking area, its outer edges may hit the basket handle. Measure interior width with the handle included, not just the cooking surface. Compare that figure with the accessory’s outside dimensions; its cooking diameter can hide a wider rim or grips that won’t clear.
Check the manufacturer’s basket specifications and confirm your air fryer’s model, basket shape, and capacity before buying ramekins, baking dishes, or kits. A set made for a five-quart fryer may fit one basket yet catch another’s handle. Leave enough room to lower the piece in and lift it out without tilting or forcing it past an obstruction. You should also be able to grip hot accessories safely with tongs or a plate gripper.
Dishwasher-Safe Accessory Picks
Dishwasher-safe silicone cups and liners simplify cleanup, but check their fit and care instructions before buying.
OXO Good Grips baking cups are reusable, dishwasher-safe, and heat-resistant; their sturdy sides let them stand without a metal pan. Siudangka reusable silicone liners also tolerate dishwasher cleaning and resist sticking, with heat tolerance up to 430°F. Choose cups when you want individual portions that hold their shape, or liners for broader basket coverage.
Either option needs to match your basket’s shape and usable floor area, leaving airflow unobstructed. Check product dimensions against your basket before ordering, then follow the manufacturer’s washing directions. Silicone tongs and basting brushes clean easily, but dishwasher safety isn’t specified; hand-wash them unless their instructions say otherwise. When in doubt, wash by hand instead.
Avoid Oversized Accessory Sets
Will an accessory set fit your air fryer without crowding it? Check every included pan, rack, liner, and skewer before buying; a bundle can suit a five-quart fryer yet overwhelm another model. A mixed set offers options, but only helps when each piece leaves cooking space and airflow. Compare the kit contents and compatibility notes rather than trusting broad claims.
- Measure your basket before shopping, then compare each accessory’s size with the space available.
- Skip sets with pieces that nearly fill the basket; separate tools may leave more room for food and circulation.
- Check liner shape and size; paper liners come in eight options, so you needn’t settle for a mismatch.
- Choose useful pieces, and return an oversized accessory that blocks airflow or makes cooking uneven.
Verify Usable Interior Dimensions
Before choosing pieces for a set, measure your basket’s usable interior width and length—not its exterior or advertised capacity. Then check the shape, corners, and clearance so an accessory can sit flat, slide out safely, and leave airflow unobstructed. A quart rating can’t tell you whether a square dish fits around rounded corners or whether a round liner wastes space.
- Measure the narrowest interior width and length, including any curved edges.
- Compare listed accessory dimensions with those measurements; don’t rely on “universal” labels.
- Test corner shape: square and round pieces use space differently.
- Leave a small gap so you can lift the piece out without scraping, and keep vents and the heating element clear.
For liners, pans, and ramekins, confirm fit for your exact model.
Conclusion
Before you buy, measure your basket’s usable width and depth, then account for its taper and handle clearance. Compare those numbers with an accessory’s base dimensions, not just its advertised diameter. Choose a shape that leaves room for airflow and matches your cooking task; a rack, liner, or pan won’t serve every meal equally well.
Check material and dishwasher guidance, and skip oversized sets. When you verify fit first, you’ll cook easily and waste less.