Indoor Grill Grease Tray Cleaning Guide
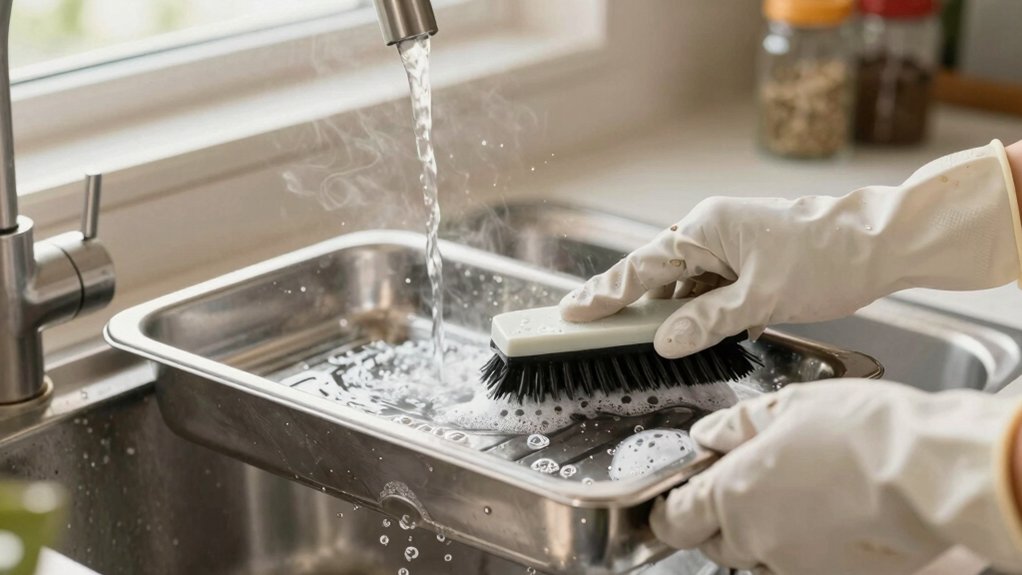
You should cool and unplug the grill. Then wear heat-resistant gloves and slide the metal grease tray out by its release points, tipping it into a waste container. Use a plastic scraper, mild dish soap, and nonabrasive sponge or cloth. Avoid metal scrapers, bleach, or oven cleaner.
Wash only when lukewarm or cool; rinse and dry fully. Inspect the nonstick coating for flaking or deep scratches. Replace if damaged. Keep going to learn model-specific tips and precautions.
Quick Overview
- Cool and unplug the grill fully before removing the grease tray to avoid burns or electrical hazards.
- Wear heat-resistant gloves. Locate the tray release points; then slide and tilt the tray to dump grease into a waste container.
- Soak the tray in hot, soapy water (once cooled) and use a plastic scraper to remove baked-on deposits. Clean with nonabrasive sponges and mild detergent. Avoid metal scrapers, steel wool, bleach, and oven cleaners.
- Inspect the nonstick coating for flaking, deep scratches, or pitting. Replace the tray if the coating is compromised.
Grease Capacity by Model
When you choose a smokeless indoor grill, check the grease-tray size relative to the cooking surface. Models around 100 sq in typically give a practical balance of capacity and ease of cleaning. Larger surfaces (120–141 sq in) hold noticeably more grease and suit family meals without constant emptying.
You’ll compare PowerXL (108 sq in) and Cuisinart variants (100–120 sq in) for balanced grease capacity. GoWise (141 sq in) and larger Ninja models hold more but need more frequent maintenance. Use model comparisons to match tray volume to your meal size and cleaning tolerance. Prioritize removable trays for safer, mess-free disposal.
| Model | Surface (sq in) | Typical Capacity |
|---|---|---|
| PowerXL | 108 | Family-sized |
| Cuisinart | 100–120 | Versatile |
Metal Tray Removal Steps
After you’ve matched tray capacity to your cooking needs and emptied obvious grease, remove the metal tray to access hardened residue and perform a thorough clean. Cool the grill, unplug it, and wear heat-resistant gloves. Confirm your model specific release points in the manual before proceeding.
- Slide the tray outward using both hands for control.
- Tilt slightly to dump residual grease into a waste container.
- Use a plastic scraper to dislodge baked-on deposits.
- Carry the tray to a sink or bucket for soaking in hot, soapy water.
- Rinse, dry, and inspect for damage or coating wear.
Handle the tray steadily to avoid spills. Reinsert only when fully dry and aligned with model specific guides to ensure proper fit and safe operation.
Nonstick-Coating Compatibility Guide
Before you clean a nonstick grease tray, check the coating manufacturer’s guidelines and note any temperature limits for washing. Don’t use metal scrapers or abrasive pads; use only the cleaning agents the maker approves.
Inspect the surface for nicks or peeling before and after cleaning. Stop if you see coating damage.
Check Coating Manufacturer Guidelines
Why check the coating manufacturer’s guidelines? You need to confirm nonstick compatibility before using cleaners, tools, or heat to avoid damaging coatings or releasing fumes. First, locate model-specific instructions in the manual or manufacturer website.
Check coating guidelines for recommended detergents, maximum water temperature, and whether soaking is allowed. Note prohibited items like bleach, oven cleaners, or metal scrapers. If the guideline permits only mild soap and soft sponges, follow that; don’t improvise.
For ambiguous cases, contact customer support and document their advice. When replacing parts, match coating type to maintain compatibility. Following these directions protects the coating, prevents warranty voiding, and keeps cleaning safe and effective for long-term grill performance.
Avoid Abrasive Cleaning Tools
Now that you’ve checked the coating manufacturer’s guidelines, make sure you avoid abrasive cleaning tools that can scratch or strip nonstick surfaces. Use only nonstick safe implements: soft sponges, microfiber cloths, or plastic scrapers, so you don’t damage the coating or create food-trapping grooves.
Never use steel wool, wire brushes, or harsh scouring pads; those will shorten the life of the tray and can release coating particles. If residues are stubborn, loosen them with hot water, dish soap, or brief heat (per manufacturer) before gentle wiping.
Inspect tools regularly for embedded grit that can become abrasive. Handling tools and trays carefully reduces injury risk and contamination. When in doubt, choose a softer tool labeled nonstick safe to protect performance and safety.
Suitable Cleaning Agents Listed
A concise list of cleaning agents that are safe for nonstick-coated grease trays will help you clean effectively without damaging the surface: Use mild dish soaps (Dawn or equivalent), diluted vinegar solutions for deodorizing and light descaling, and commercial nonabrasive degreasers labeled safe for nonstick coatings. Avoid oven cleaners, bleach, and high-pH industrial degreasers that can degrade coatings.
For routine compatible cleaning, spray diluted dish soap or a Dawn Power Wash on cooled trays. Let sit briefly, then wipe with a soft sponge. Use a 1:1 water-vinegar mix for odors and light scale, applied with steam or warm water. Choose degreasing agents marked nonabrasive and noncaustic; always test a small area, rinse thoroughly, and dry to prevent residue that harms the coating.
Temperature Limits Before Washing
How hot should the grill be before you wash nonstick-coated parts? You should never wash while parts are hot; allow the grill to cool to lukewarm or room temperature.
Check manufacturer temperature limits for nonstick coatings: many degrade above 400°F (204°C) or when exposed to rapid thermal shock. As a rule, wait until surfaces are comfortably touchable or below 120°F (49°C) before applying water or detergents.
Follow washing precautions: unplug the appliance, empty the grease tray, and avoid sudden temperature changes (no cold water on warm coatings). Use mild soap and a soft sponge; avoid abrasive tools on coated areas.
These steps protect the coating and reduce off-gassing, peeling, or premature wear.
Inspect For Coating Damage
Ever wondered how to tell if your grill’s nonstick coating is still safe to use? Check for flaking, deep scratches, discoloration, or pitting each time you clean the grease tray. You’ll want to inspect coating visually and by running a soft fingertip across the surface. No roughness should transfer.
If coating is compromised, stop using abrasive scrapers. Follow your model compatibility instructions to choose safe tools and replacement parts. Consult the owner’s manual or manufacturer site to confirm model compatibility for replacement trays or coatings. Damaged coatings can release particles and reduce nonstick performance, so prioritize safety: replace the tray or contact support rather than keep cooking on a degraded surface.
Keep records of inspections and actions taken.
Frequently Asked Questions
How Often Should I Deep-Clean the Grease Tray Beyond Routine Washing?
You should deep-clean the grease tray every 1–3 months depending on use. Heavy weekly grilling calls for monthly deep cleaning; light use can stretch to quarterly. This deep cleaning cadence complements routine grease tray maintenance to prevent buildup and fire risk.
Always unplug and let the grill cool. Scrape solids into a trash bag, soak removable parts in hot soapy water, rinse thoroughly, and dry completely before reinserting to ensure safety.
Can I Compost Grease-Soaked Paper Towels From the Tray?
No, you shouldn’t compost grease-soaked paper towels. Grease disposal into compost harms compost suitability by attracting pests, slowing decomposition, and creating odors.
Instead, scrape excess grease into a sealed container or trash. Wipe towels into a plastic bag, and discard in regular waste. For safety and hygiene, rinse trays with hot soapy water. Dispose of contaminated paper towels in a tied bag to prevent leaks and smells.
Is It Safe to Use Oven Cleaner on Heavily Baked Grease?
No, it’s not safe to use oven cleaner on heavily baked grease inside your grill. Oven cleaner can damage non-stick coatings, protection glass, and painted surfaces; it can also leave toxic residues.
Instead, use degreasing dish soap, a plastic-safe scraper, or a grill-specific degreaser. Soak removable parts and rinse thoroughly. If you must use a strong chemical, test on a hidden area; wear gloves and eye protection, and ventilate well.
How Do I Prevent Grease Tray Odors Between Uses?
Empty and dry the grease tray after each use, since that prevents odor buildup. Scrape and wipe residues; then wash with hot soapy water and dry thoroughly.
For odor control, line the tray with disposable foil or use a sealed plastic bag for collected grease before storage. Store the tray upright in a ventilated, cool place or sealed container to avoid smells spreading.
Replace liners regularly and keep the grill area clean.
Can I Recycle Old Grease From the Tray After Filtering?
Yes, you can recycle old grease after filtering, but follow recycling guidance and safety steps. Strain solids, cool the grease, and store it in a sealed, clearly labeled container.
Deliver it to a municipal biodiesel or recycling facility that accepts used cooking oil. Do not pour it down drains or into soil.
Consider environmental impact: improper disposal harms waterways and wildlife. Wear gloves, avoid mixing contaminants, and transport securely.
Conclusion
You’ve learned how grease capacity varies by model and how to remove metal trays safely. Before you clean, check the nonstick-coating manufacturer’s guidelines. Never use abrasive tools that can strip coatings. Use only the suitable cleaning agents listed and wait until the tray has cooled to the recommended temperature before washing.
Inspect the tray for coating damage after each clean. Replace it if you see flaking or deep gouges to avoid health and fire risks.