Toaster Oven Pan Fit Measurement Guide
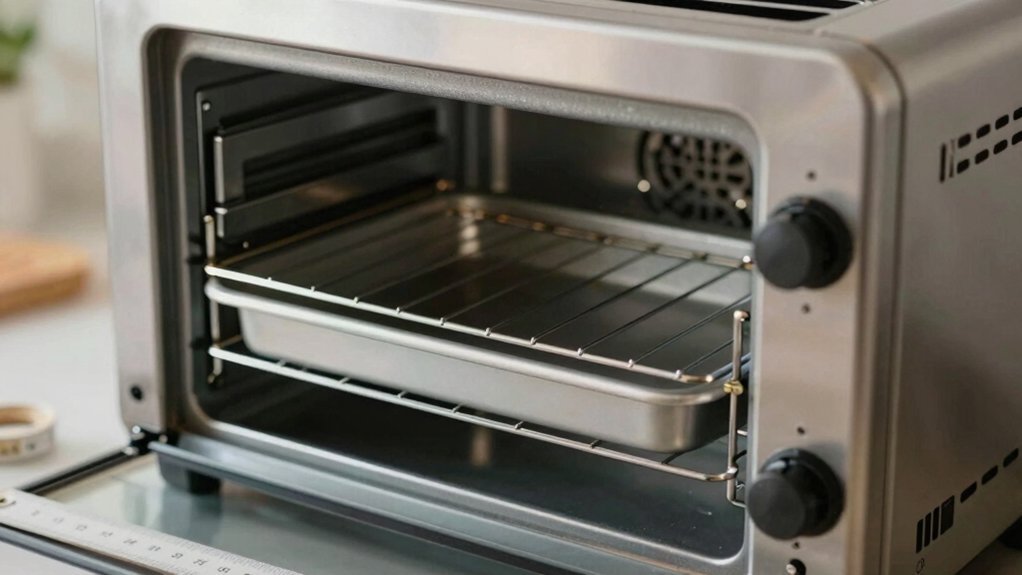
Measure your toaster oven’s usable interior across the rack guides (not the walls). Subtract any guide or bump-out protrusions and allow at least ½” clearance each side for airflow and 1½” above for covered pans.
Use the lowest rack to check height. Include full handle thickness and grip shape, and test the hinge swing radius so the door clears. Record measurements for pan exterior, handles, and any spacers. Continue for step-by-step checks and examples.
Quick Overview
- Measure interior width across the rack guides (not wall faces) and subtract guide protrusions to get usable pan width.
- Allow at least ½” side clearance and ¼” guide extension for airflow and easy insertion.
- Test pan height on the lowest rack. Keep 1½” clearance from top heating elements for covered or elevated pans.
- Include full exterior thickness, raised grips, and handle shape when measuring overall pan depth to avoid hinge or door interference.
- Slide pan with rack in place and check hinge swing radius and door arc to confirm no contact during operation.
Interior Rack Width Chart
How wide does your pan need to be to sit and slide correctly in a toaster oven? You measure rack width directly at the guides or popouts, not sidewalls, to check pan compatibility.
Allow the manufacturer’s ¼” guide extensions (Breville) and the minimum ½” side clearance so air circulates. Use the table below to visualize common rack widths versus recommended pan max widths.
| Rack width | Recommended max pan width |
|---|---|
| 11.25″ | 9.25″ |
| 11.5″ | 9.5″ |
| 13.25″ | 11.25″ |
| 13.75″ | 12.75″ |
Confirm interior width excludes rounded bump-outs. Measure slide rack depth separately for full pan compatibility.
Maximum Pan Dimensions
Wondering how big a pan you can safely use in your toaster oven? Measure the interior width across the rack guides, not the wall faces. Then subtract the manufacturer’s guide protrusion to determine usable maximum dimensions. Use the lowest rack for height checks and confirm ½-inch side clearance for airflow.
Verify the listed interior width excludes rounded bump-outs and rack guide extensions. Confirm pan exterior dimensions fit within sidewall-to-sidewall distance, not including handles or knobs. Ensure at least 1½ inches clearance from top elements for covered pans and elevated dishes.
Apply these precise checks to prevent contact with walls or elements. Ensure uniform heating and follow the owner’s manual when model-specific limits differ.
Handle Clearance and Hinges
When you measure pan handles, include the full exterior thickness and any raised grips so the handle clearance reflects real fit.
Check hinge swing radius and door clearance by measuring from the closed rack position through the door arc. Note any spacers or lips that reduce usable depth. Also, record handle material thickness and shape since rigid or bulky handles can require extra clearance even when exterior dimensions seem to fit.
Handle Clearance Measurement
Why does handle clearance matter? You must confirm handle clearance so exterior handles or grips don’t contact the oven door, front trim, or internal racks during insertion and removal. Measure from the oven’s inner face to the outermost handle point on the pan or dish, accounting for handle thickness and any offset.
With the rack in its intended position, slide the pan in and note if the handle causes hinge interference or prevents the door from closing fully. If interference appears, reposition the rack lower or choose a pan with reduced handle projection. Record the minimum required distance and compare it to the oven’s usable depth and door gap specifications. Use these measurements to ensure safe operation and maintain recommended clearances.
Hinge Swing Radius
How far will the oven door and attached hinges swing when you open it, and how does that affect handle clearance? Measure hinge swing radius from the closed door plane to fully open, noting handle location and any arc the handle describes.
Place a tape measure at the hinge pivot and record the radius to the furthest handle point; that value defines required front clearance. Verify hinge swing latitude: the angular range the hinge travels; confirm partial-open positions still clear surrounding obstructions.
When you fit pans or store tools near the oven, use the measured radius and latitude to maintain at least the manufacturer’s recommended clearance. Document measurements and compare to appliance specs to ensure safe, unobstructed operation.
Clearance At Oven Door
Where will the door and its handle travel as you open the oven, and does that arc clear nearby counters or storage? Check the clearance at oven door by measuring the full swing radius from hinge pivot to the outermost handle point.
With the door fully open, mark the arc on adjacent surfaces and confirm no obstruction within that path. Measure handle clearance both horizontally and vertically; include any raised or recessed hinge hardware. Use the lowest rack position when testing to reflect worst-case interference.
Maintain at least 1 inch additional space beyond the measured arc for safe access and cooling airflow. Document the dimensions and compare them to countertop edges, cabinet faces, and appliance handles before final placement.
Spacer And Lip Considerations
When measuring for spacer and lip clearances, consider the hinge arc and handle projection so the door can open fully without contacting adjacent surfaces or obstructing racks. You’ll measure from the hinge pivot to the outermost handle point and from the door lip to any countertop or cabinet face.
Apply spacer considerations by specifying a minimum clearance equal to the hinge arc radius plus 1/8 inch tolerance to prevent contact when loaded. For lip considerations, ensure the door lip won’t catch on racks or pans; measure lip overhang and maintain at least 1/2 inch free space from rack faces.
Record dimensions on a template, verify against manufacturer tolerances, and update fit plans before final installation.
Handle Material Thickness
Why does handle material thickness matter for fit and hinge clearance? You need to account for handle material when verifying pan fit because exterior thickness affects lateral and vertical clearances at the rack and door hinge.
Measure from the pan’s outermost handle face, not the cooking cavity, and compare to available side and hinge space. Note thickness constraints specified by the oven: many models require a minimum ½-inch side clearance; thicker handles can violate that.
For hinged doors, ensure handles don’t contact door stops or obstruct full closure. If thickness approaches constraints, choose low-profile or removable handles, or rotate the pan to align handles with rack gaps.
Record handle material and measured thickness to maintain repeatable, standards-focused fit checks.
Frequently Asked Questions
Can I Use Glass or Ceramic Dishes in a Toaster Oven?
Yes, you can use glass or ceramic dishes in a toaster oven if you follow glassware safety and container material choices guidance. Use oven-safe labeled pieces. Avoid thermal shock: don’t move from fridge to hot oven. Ensure at least ½-inch clearance from walls and 1½–2 inches from top elements.
Don’t touch heating elements, and remove or replace tall knobs. Consult your oven’s manual for model-specific temperature and clearance limits.
How Do I Measure for a Covered Dutch Oven Lid?
Measure the lid fit by placing the Dutch oven on the lowest rack. Remove any removable knob if needed. Use a tape measure to record lid height from rack to the lowest-sitting top heating element; that’s your critical clearance.
For diameter, measure the lid’s exterior across its widest point, excluding handles. This measurement method ensures you have at least 1½–2 inches clearance from top elements and ½ inch side clearance for safe operation.
Will Silicone Bakeware Affect Cooking Times?
Yes, silicone bakeware can affect cooking times. You’ll usually need to extend cooking times slightly and monitor doneness. Silicone insulates, slowing heat transfer compared with metal; therefore, cakes and breads may take longer and brown less. Use the same oven temperature and add 5–15% more time as a starting point.
Test with a toothpick or thermometer for doneness. For consistent results, standardize pans and positions, and note exact time adjustments.
Can Pans Be Used on Multiple Rack Positions Simultaneously?
Yes, you can use pans on multiple rack positions simultaneously if pan fit and oven compatibility allow it. You’ll measure and verify that pans don’t touch walls, elements, or each other. You must also ensure that required clearances (½ inch sides, 1½–2 inches from top elements) are maintained.
Position racks lowest and middle as needed. Avoid obstructing airflow and consult your oven’s compatibility specs to prevent uneven cooking or safety hazards.
Are Convection Settings Safe With Oversized Pans?
Yes, but cautiously. You shouldn’t use convection settings with oversized pans if they touch walls, racks, or the door because convection safety relies on clear airflow. You’ll leave at least ½ inch around pan sides and 1½ to 2 inches from top elements for covered dishes.
If an oversized pan blocks airflow or sits too close to heating elements, avoid convection or use a smaller pan. Always follow your oven’s clearance guidelines for safe, even cooking.
Conclusion
You’ve now got the exact measurements and checks to ensure your pans fit snugly and safely in your toaster oven. Measure interior rack width, account for maximum pan dimensions, and verify handle clearance and hinge swing radius.
Check door clearance, spacer and lip depth, and handle material thickness against your oven’s specs. Use precise calipers or a tape, document each dimension, and compare to the oven’s stated tolerances before using any pan.