Sous Vide Food Safety Temperature Guide
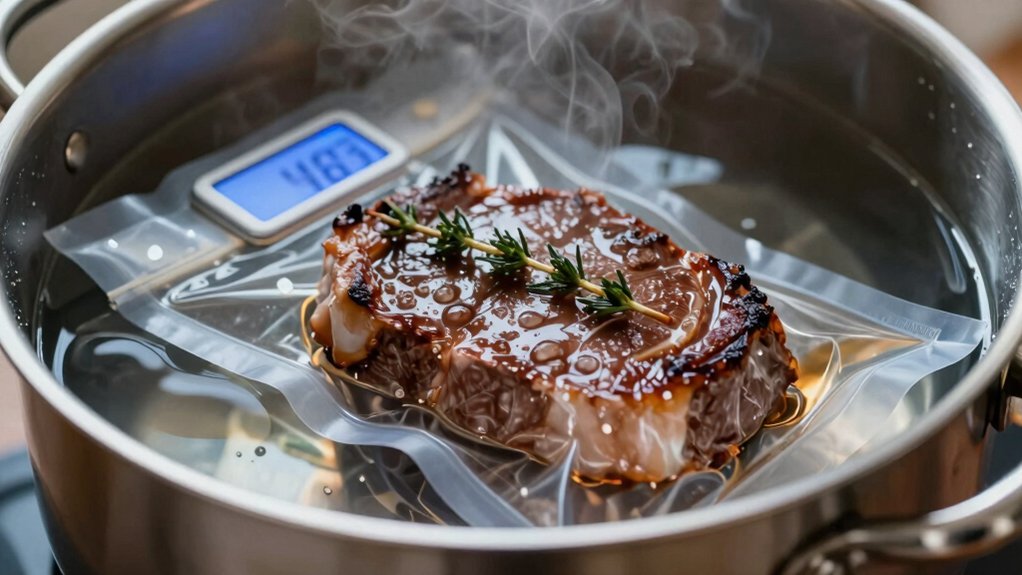
You control pathogen risk by holding the food’s core at a target temperature for a specified time: higher temperatures need shorter holds; lower temps require longer exposure. Start timing when the core reaches the set point. Thickness dictates heat-up and total hold.
Inspect seals for leaks, reseal promptly if needed, and follow cooling limits after pasteurization. Use validated temperature–time tables for Salmonella and Listeria reduction. Continue for specifics on values, thickness, and seal troubleshooting.
Quick Overview
- Pasteurization depends on both temperature and time; higher temperatures need much shorter hold times for the same pathogen reduction.
- Start the safety timer when the food’s core reaches the target temperature, not when it enters the water.
- Thicker cuts require longer total immersion to reach and hold core temperature; measure thickness and core temp.
- Common safe ranges: ~54°C (130°F) requires ~112 minutes; ~60°C (140°F) achieves pasteurization in roughly 11–28 minutes.
- Inspect seals before and after cooking. Reseal or discard bags with leaks to avoid contamination during the danger zone.
Temperature-Time Pasteurization Chart
Why does temperature combined with time matter for sous vide pasteurization? You need precise pasteurization timing because core temperature and exposure duration determine pathogen reduction. Higher temps sharply reduce required time. Thickness impact matters: thicker items require longer total time because heat penetration extends the necessary hold after the core reaches target.
| Temp (°F/°C) | Representative time |
|---|---|
| 130 / 54 | 112 min (approx) |
| 140 / 60 | 11–28 min |
Use evidence: Salmonella data show 130°F needs ~2 hours while 140°F drops to minutes. Listeria requires ~3× those times. Start timing from core reach; account for heat-up; and limit time in danger zone. For safety, hold ≥130°F after pasteurization to prevent spore germination and follow cooling limits.
Protein Thickness & Time
Thickness directly controls how long a protein needs to stay in the water bath because heat must travel from the surface to the core. That transit time, not just the target temperature, determines when you start the pasteurization clock. You must account for protein thickness and time density: thicker cuts store more thermal mass and require proportionally longer exposure to reach core pasteurization. Use measured thickness, not weight, to set minimal hold times.
Consider these factors analytically:
- Measure maximum thickness at the thickest point; thickness predicts heat penetration.
- Higher time density (longer time per millimeter) compensates for low temperatures.
- Surface area-to-volume ratio affects heating rate; compact cuts take longer.
- Preheat baths to minimize initial lag in heating.
- Use validated charts or calculations to convert thickness to safe hold time.
Apply evidence-based timing. Then verify core temperature.
Vacuum Seal Failure Troubleshooting
If a vacuum seal fails during sous vide, you should first detect the break by visual inspection and by checking for floating or water inside the pouch. Quickly identify air leaks by submerging the sealed edge and looking for bubbles. Reseal using a heat sealer or a reliable clip/zipper method to minimize time in the danger zone.
To prevent future failures and validate integrity, use proper sealing equipment. Inspect seal beads for continuity and confirm with a brief pressure test before cooking.
Detecting Seal Breaks
How can you quickly spot a vacuum seal failure before it compromises sous vide safety? Inspect seal integrity visually and by touch: Look for wrinkling, channeling, or gaps along the heat seal line. Press the bag; loss of rigidity indicates compromised vacuum.
Listen for hissing when you lift the bag from the water; trapped bubbles or foam forming on the surface suggest ingress. Weigh suspect pouches against expected weight; added water or loss of vacuum alters mass. Use a calibrated thermometer to compare interior food temperature response: A broken seal changes thermal transfer patterns.
If you detect failure, discard or repackage and reheat to validated pasteurization times/temps. Document failures to identify equipment or technique causes and prevent recurrence.
Identifying Air Leaks
Having a reliable method to spot seal failures helps you move quickly into identifying where air is entering the pouch and why. Start by visually inspecting the entire seam under good light; micro-gaps and uneven welds correlate strongly with leaks.
Submerge the sealed bag in water and apply slight pressure. Bubbles indicate leak location and confirm identifying air leaks objectively. Use a dye or food-safe colored liquid inside a test pouch to trace ingress paths for complex seals.
Measure vacuum retention over time with a gauge; consistent pressure decline quantifies failure rate. Record findings (location, bubble size, time-to-failure) to distinguish material faults from machine calibration issues.
These evidence-based steps complement detecting seal breaks and guide whether to discard, reprocess, or repair equipment.
Resealing Techniques Fast
Want to fix a failed vacuum seal quickly and reliably? You should assess the pouch immediately: note the leak location and whether liquid or air caused failure.
For rapid resealing, blot moisture, reposition the pouch lip on a clean, dry sealing strip, and use a commercial vacuum sealer with adjustable suction to control resealing speed; too fast can draw liquids into the channel. If you only have an impulse sealer, use a folded paper towel barrier at the edge to block fluids and perform short, repeated seals.
For small punctures, use food-safe heat-resistant tape or resealable bags inside a new pouch. Use simple leak detection: submerge the sealed pouch and watch for rising bubbles to confirm integrity before entering the water bath.
Preventing Seal Failures
After you’ve practiced quick resealing, shift focus to preventing failures in the first place: most seal problems stem from contamination, improper pouch positioning, or excessive moisture rather than equipment defects.
Inspect pouch rims for food particles or fats. Even microscopic debris disrupts the heat seal and increases air leakage risk. Position flat, with the seal area completely dry. Use a paper towel or compressed air to remove condensation before sealing. Avoid overfilling; leave headspace so edges align without stretching. Use appropriate pouch thickness and validated vacuum pressure; thinner films tear more easily.
When sealing liquids, pre-freeze or use chamber vacuum to prevent boil-off. Log failures and correlate with variables (product type, moisture, bag brand) to identify repeatable causes and reliably prevent seal compromise.
Validating Seal Integrity
Why did the seal fail this time? You’ll diagnose by systematic tests: visual inspection, submersion leak test, and pressure differential checks. Document findings and compare against baseline seal metrics. Treat any single defect as an invalid topic for overall packaging quality only after confirming repeatability.
Use calibrated gauges and temp-stable samples to avoid irrelevant concept noise, like bag appearance alone. If bubbles appear during submersion, measure seam width and tensile integrity; record where failure initiates. Correlate failures with process variables: film type, vacuum level, seal time, and heat bar temperature. Then run controlled trials adjusting one variable at a time.
Validate corrective actions with statistical sampling (AQL) and retain records for traceability and food-safety compliance.
Frequently Asked Questions
Can I Sous Vide Safely Without a Vacuum Sealer?
Yes, you can do vacuumless sous vide safely using alternative sealing like zip-top bags with the water-displacement method or heat-sealing with a household iron. You’ll need accurate temps and time control. Keep food below 55°C; limit times and avoid prolonged danger-zone exposure.
Ensure bags are food-grade, fully submerged, and monitor water temp. Refrigerate or cool quickly after cooking. Vacuumless sous vide works if you follow these evidence-based safeguards.
How Do I Prevent Botulism in Low-Acid Sous Vide Foods?
You prevent botulism by controlling time, temperature, acidity levels, and oxygen: acidify low-acid foods to pH ≤4.6. Keep vacuum or anaerobic exposure minimal. Pasteurize using validated time–temperature schedules or heat to ≥130°F long enough to achieve equivalent lethality.
Chill rapidly: 130°F to 41°F within 6 hours. Store ≤41°F (ideally ≤5°C) and limit sous-vide hold times. Use calibrated thermometers and follow tested recipes to ensure safety.
Are Spices/Oils Safe to Sous Vide With Food?
Yes, you can sous vide with spices and oils, but practice spice safety and check oil compatibility. Whole spices are safer than powdered; they shed fewer particles that could create anaerobic pockets. Use measured oil amounts to improve heat transfer without blocking seal integrity.
Infuse flavors before or after cooking for control. Always follow time and temperature pasteurization, refrigerate promptly, and avoid raw garlic or onion in vacuum pouches unless you have validated safety.
Can I Reheat Sous Vide-Cooked Food Without Overcooking?
Yes, you can reheat sous vide-cooked food without overcooking by using a low-temperature reheating technique and precise timing. Reheat in a water bath at the original cooking temperature or slightly below (e.g., 130–140°F) until the center reaches target temp. This preserves texture preservation and avoids further protein denaturation.
Hold times should be short; monitor with a calibrated probe thermometer to ensure safety and minimal moisture loss.
Is Sous Vide Safe for Home-Canned or Preserved Items?
No, you shouldn’t use sous vide for home-canned or preserved items because safe canning requires temperatures and pressures that inactivate Clostridium botulinum spores; sous vide won’t reliably reach those.
Using sous vide on preserved goods increases botulism risk unless you follow validated canning protocols first. If you want low-temperature finishing, you can only apply it to properly processed, commercially safe cans or jars. Then cool and store per guidelines.
Conclusion
You’ve learned the critical temperatures and time relationships that make sous vide safe, and how thickness affects pasteurization. When a vacuum seal fails, you’ll detect it by visual cues and swelling. Trace leaks to seal edges or valve faults, and use quick resealing or dry-heat methods to restore integrity.
Prevent failures by cleaning seams, avoiding overfilling, and testing seals. Validate each bag before cooking to ensure consistent, evidence-based food safety.