How to Remove Baked on Grease From Air Fryer Basket
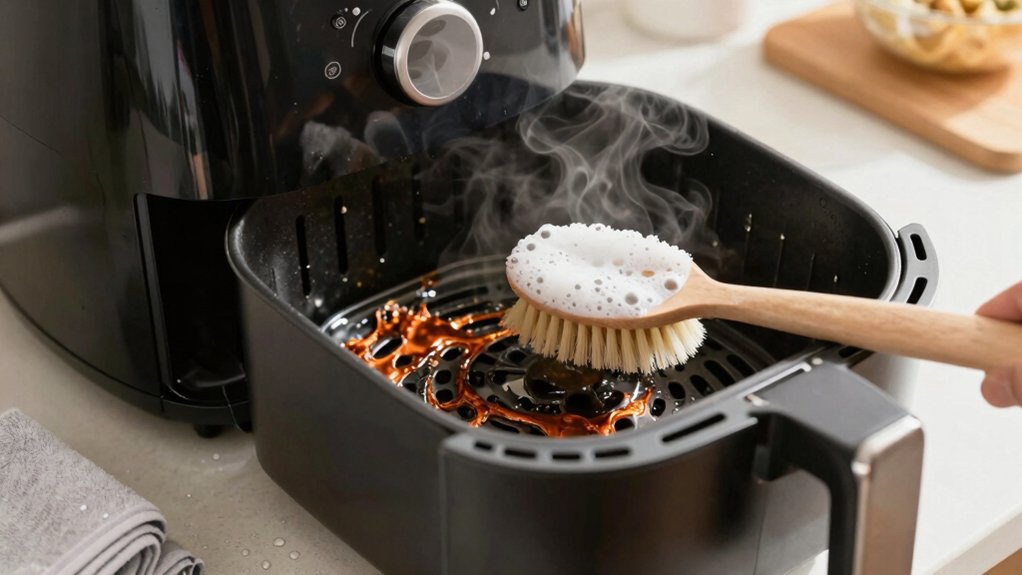
You can remove baked-on grease by first running a 400°F steam-clean cycle for 5 minutes.
Then, let the basket sit for 10 minutes. When cool enough, fill it with very hot tap or boiled water and soak for 15–30 minutes. For stubborn spots, let it soak overnight with a dishwasher pod.
Scrub gently with a baking-soda paste and a soft brush; rinse and dry. Avoid abrasives on nonstick surfaces, and follow your manual for safe temps and tools to learn more.
Quick Overview
- Run an air-clean steam cycle at 400°F for 5 minutes. Then let the basket sit for 10 minutes to loosen grime.
- Fill the basket with very hot or boiled water and soak for 15–30 minutes to soften baked-on grease.
- Scrub gently with a baking soda paste and a soft sponge or nylon brush to remove residue without damaging the coating.
- For stubborn spots, soak overnight with a dishwasher pod or hot water. After soaking, repeat gentle scrubbing.
- Rinse thoroughly. Finish with a lemon-juice rinse for degreasing and scent. Then dry completely before use.
Basket Size & Capacity
Wondering which air fryer size fits your needs? You’ll assess basket sizing and capacity impact to pick the right model. Consider how much you cook and whether you’ll batch food; that guides capacity choice more than footprint.
| Size Category | Capacity Range |
|---|---|
| Compact/Personal | 1.5L–3L |
| Mid-Size/Family | 3.5L–5.5L |
| Large/XL | 5.8L–8L |
| XXL/Dual-Basket | 9L–12L+ |
If you cook for one or two, a 2–3L basket minimizes batching and saves energy. For families, 4–6L balances meals with counter space.
Do you want whole chickens or to avoid batching? Choose 5L+. Remember, shape affects usable volume; width and depth change airflow and fitting.
Cleaning Temperature & Times
How hot should you run cleaning cycles, and for how long? You’ll use heat to loosen grease; then follow with targeted cleaning like a baking soda paste or lemon juice rinse.
- Run an air-clean cycle at 400°F for 5 minutes to generate steam. Let the basket sit for 10 minutes before handling.
- For tougher spots, fill the basket with very hot tap water (or boiled water) and let sit for 15–30 minutes. This softens baked-on grime.
- If residue remains, soak overnight with a dishwasher pod or hot water. Then scrub with a baking soda paste; finish with a lemon juice rinse for degreasing and scent.
Always ensure the unit is cool enough to safely remove and scrub components.
Nonstick Coating Compatibility
Before you start scrubbing, check your air fryer manual for the nonstick type and any manufacturer warnings so you don’t void the warranty. Know the coating’s heat limits and use only safe tools: soft brushes, non-scratch pads, and mild soap. Avoid abrasive cleaners or steel wool that can strip the finish.
If the coating’s damaged, consider manufacturer-approved recoating or professional repair rather than aggressive home fixes.
Check Manufacturer Guidelines
Want to avoid voiding a warranty or ruining a nonstick finish? First, check manufacturer resources before you try any aggressive cleaning. Look in the manual or on the maker’s website for specific air fryer guidelines about coatings, recommended cleaners, and whether parts are dishwasher-safe.
If the manufacturer warns against abrasives, avoid baking-soda scrubs or metal scrapers and use gentler methods instead. Note any temperature or chemical limits they list so you don’t stress the coating. If guidance is unclear, contact customer support and describe the residue and your planned method.
Keep a record of their reply; it’s useful if warranty questions arise. Following manufacturer directions preserves the finish and prevents unintended damage.
Heat Resistance Limits
Curious about how much heat your air fryer’s nonstick coating can take? You should check the manual for the maximum safe temperature and avoid exceeding it during cleaning cycles or repairs. Most coatings resist normal cooking temps but degrade at sustained high heat; this can cause flaking or reduced release.
If you plan to use steam cleaning at 400°F, confirm compatibility first. When replacing accessories, choose parts rated for the same temperature and avoid improvised liners that can melt. Prefer silicone mats labeled food-grade and heat-resistant. Be wary of cheap inserts sold in nonrecyclable or unclear recyclable packaging.
If you see bubbling, discoloration, or smell off-gassing, stop use and contact the manufacturer for guidance to prevent damage or health risks.
Safe Cleaning Tools
Several gentle tools will clean your air fryer without damaging the nonstick coating: use a soft sponge or non-scratch scour pads, silicone brushes, and soft-bristle nylon brushes for mesh and crevices. Avoid metal scouring pads, steel wool, or sharp metal scrapers that can scratch or strip the coating.
Choose safe tools rated for nonstick safety and inspect pads for embedded grit before use. Use silicone spatulas or plastic scrapers to lift softened residue after steaming or soaking. Microfiber cloths wipe away loosened grease without abrasion. Replace worn pads once fibers compress or darken.
Wear cleaning gloves to protect your skin while you work. Store tools separately to prevent cross-contamination and accidental contact with any abrasive implements.
Avoid Abrasive Cleaners
Now that you know which tools are safe for nonstick surfaces, avoid abrasive cleaners and pads that can strip the coating and shorten the basket’s life. Use mild dish soap and a non-scratch scour pad or soft bristle brush for routine cleaning.
Skip commercial avoidant cleaners that advertise heavy abrasion; their grit can dull finishes and increase sticking. Never use metal brushes, steel wool, or harsh scouring powders on the basket or grate. If a residue won’t budge, soak with hot soapy water, a dishwasher pod, or a baking soda paste and let it soften before gentle scrubbing.
Rinse thoroughly and dry completely. Treat the coating gently and you’ll preserve nonstick performance and extend the basket’s usable life.
Recoating And Repairs
Wondering whether you can recoat or repair a damaged air fryer basket? You can consider it, but recoating challenges make DIY fixes risky. Factory nonstick layers (PTFE or ceramic) bond under precise heat and surface prep; consumer sprays or kits often won’t adhere evenly and may emit fumes when heated.
For small scratches, focus on repairs considerations like sanding rough edges lightly, deep cleaning with the paste method, and avoiding metal tools that worsen damage. Check your warranty and manufacturer guidance first. Some baskets are replaceable.
If you pursue recoating, use a product explicitly rated for cookware and follow curing instructions in a well-ventilated area. Alternatively, opt for a professional recoat service to ensure food-safe results and avoid voiding guarantees.
Frequently Asked Questions
Can I Use Bleach to Disinfect the Air Fryer Basket?
You shouldn’t use bleach directly on the air fryer basket. Bleach safety matters: it can corrode coatings, leave toxic residues, and void warranties.
Instead, disinfecting ethics mean choosing food-safe methods—hot soapy water, baking-soda paste, or diluted white vinegar followed by thorough rinsing. If you do use a diluted bleach solution for non-coated metal parts, rinse repeatedly, air-dry fully, and never mix bleach with ammonia or vinegar.
Follow manufacturer guidance.
Will Steam Cleaning Damage Electronic Components?
No, steam cleaning won’t damage electronic components if you’re careful. You’ll generate steam inside the cooking chamber only; keep water confined to the basket and tray. Never immerse the main unit or its control panel.
After steaming, unplug and let the appliance cool and dry fully before reusing. If seals, vents, or the control area get wet, wipe them immediately and allow thorough drying to protect electronic components.
Can I Put the Basket in the Oven to Loosen Grease?
You can, but be careful: most air fryer baskets are oven-safe. Yet you’ll want to verify manufacturer guidance first. Use oven greasing techniques sparingly. Place the basket on a baking sheet, set oven to 250–300°F, and heat 10–15 minutes to loosen grime.
Don’t heat nonstick coatings above recommended temps. After cooling slightly, scrub with a baking-soda paste. Two word discussion ideas: “safety check” and “coating limits” before you proceed.
How Often Should I Deep-Clean the Entire Air Fryer?
You should deep-clean the entire air fryer every 1–3 months, depending on use; if you cook greasy or frequent meals, clean monthly.
Between deep cleans, do a quick wash after each use. For heavy buildup, combine steam and paste methods. Keep filters and heating element free of residue.
Regular upkeep prevents odor, maintains performance, and extends the appliance’s life.
Is It Safe to Use Steel Wool on Stubborn Spots?
No, you shouldn’t use steel wool on nonstick surfaces; it’ll scratch and damage the coating. Instead, choose non-scratch abrasive pads or a soft-bristle brush for stubborn spots.
If grease is baked-on, try the steam or baking soda paste methods first. You can also use a dishwasher pod soak for severe residue. Wear gloves, reapply paste as needed, and rinse thoroughly.
Replacing the basket’s coating is harder than preventing scratches.
Conclusion
You can get baked-on grease out without wrecking the basket. First, check your manual for coating limits and max temps. Soak the basket in hot, soapy water or a vinegar-water mix to loosen grime. Then, use a soft brush or nylon pad; no steel wool or harsh abrasives.
For stubborn spots, heat the basket briefly to loosen grease. Cool it, then scrub gently. If the coating’s damaged, consider manufacturer repair or replacement to stay safe.